Bloggers Trend Keeping You Up To Date
You should also be aware that fixing a Laptop screen in Sydney is not always easy, and there is a chance that you can make the problem worse by voiding your manufacturer’s warranty. Before starting to replace the screen, it is important to feel confident in your abilities and think about whether it would be more convenient for you to take it to a qualified repair shop. Even those who have never replaced the screen can do this depending on the type of computer. Just keep in mind that if you have a Laptop Sydney with a touch screen, this can greatly complicate the process.
How Much Does A Laptop Sydney Screen Repair Cost?
If you are interested in the broken cost of Repairing a Laptop Screen, you will be glad to know that it is not as expensive as you might guess. The cost of professional repairs is usually about 300 Australian dollars [1]. If it’s convenient for you to work on your Laptop Sydney yourself, you can usually find removable screens on the net at affordable prices — sometimes between AU$ 50 and AU$ 100 — and it takes only an hour or two to replace them. If you are ready to take the jump and do it yourself, then in the end you can save the computer that you might have thought was necessary to replace. Here are 5 steps you can take to successfully replace or repair a cracked screen on your computer.
Know Your Model And Evaluate The Damage.
Before you begin the screen change process, it is important to know exactly what is wrong and what needs to be fixed. The type of device you have can affect how much you have to pay for another screen, as well as its age, which can make it difficult to find a replacement. You should do an online research to find out if you have the opportunity to fix the screen yourself.
Inspect Laptop Sydney
You will also need to perform a full scan of your computer to determine if your screen is the only problem. A destroyed graphics card or computer that does not start indicates that the new screen is not enough for you to work again. In addition, if the case of your Laptop Sydney has received physical damage, you may have problems with the screen repair. After you have looked at your device and determined whether you can fix it yourself, it’s time to find the right screen for your computer.
Find The Right Screen In Canberra
One of the main reasons why you should know your Laptop Sydney model is that you are sure that you are buying the right screen for a replacement. Although a number of companies offer Laptop Sydney screen repair kits that can simplify the process, if you order the wrong screen, you will not be able to carry out any repairs. If it is difficult for you to determine the model of your computer, you can go to the Settings menu and find the serial number that will help you in your search.
This is not a complete guide for all computers, but it should cover the basics for most models.
You will need several tools to properly install the new screen. These tools can greatly simplify the process and allow you to effectively correct errors.
Prepare yourself with the following at hand:
- A clean, flat surface that you can work on
- spatula or similar object to remove the screen frame
- Phillips magnetic screwdriver
- Pin or needle to remove the panel
- Small plate for screws
Adhesive Or Tape For Attaching The New LCD To The Laptop Sydney Frame
Screen repair kits are also available for some models, so it’s worth examining the type of your computer and see if they are available. These kits provide you with everything you need in advance so you can get started and not worry about the lack of the necessary tool. Of course, items around your home can work just as well, saving you some money. After you have collected the tools necessary to replace the screen, you can begin to repair your device. Place the closed notebook on the flat surface you have chosen and keep the tools close by.
Remove Power Supplies
First, turn off the Laptop Sydney and make sure it is disconnected from the power source to avoid the risk of electric shock. Following this, it also helps to remove the battery to avoid other problems.
Carefully Remove Stickers And Screws.
From there, you will need to use a pin to remove the stickers located on the panel so that you do not damage them. You will need to use them later, after your screen is properly installed, so make sure that they are not lost and that you keep them with the sticky side up so that you can reuse them. Put them in a safe place so that when you install a new screen, they are easy to find.
It’s time to carefully remove the front panel. Be careful when deleting the old screen frame, because you will need to reinstall it after replacing the screen. Using a spatula or other flat object, you can tear off the screen from the cover of your Laptop Sydney.
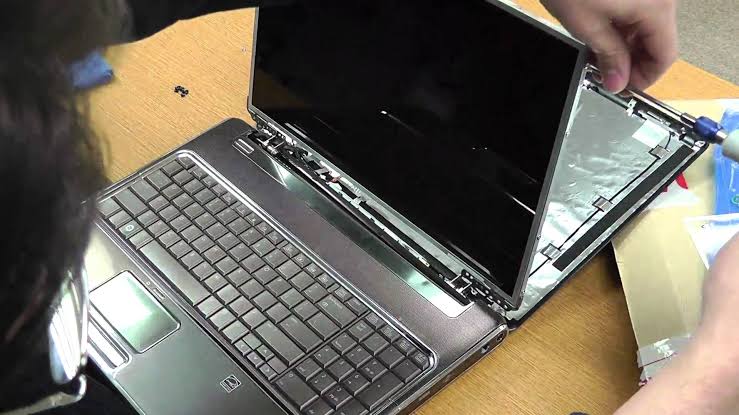
Remove The LCD
One of the hardest parts of replacing your Laptop Sydney screen is removing the LCD. First, make sure the front panel is completely closed so that you can freely access the LCD screen. It will be mounted on the metal frame of the Laptop Sydney, and you will have to remove it from the left and right sides.
Disconnect Cable Connectors
After removing attachments, your screen should now lie on the keyboard. Making sure that there is enough space between the LCD and the metal frame may not be easy, but care must be taken not to damage the video cable from the back of the screen to the Laptop Sydney case. If it is damaged, you will need the help of a professional to repair it.You can usually find the connectors in the center, although they may be located at the bottom of the screen. It is likely that glue was used to connect them, so you will need to carefully move one from the other. There may also be some tape that needs to be removed, but in general it should be pretty simple to disconnect your LCD from the video jack. Install it somewhere away from your tools.
Insert A New Screen
When you remove the screen, you can find where your new one will go. Place it face down in the frame so that it fits perfectly. After that, you can connect the video connector so that it is located exactly where the previous LCD was sitting. Make sure it is as aligned as possible, then attach it with tape or glue.